A new pattern available: called "In the Moment" designed by Anne Bright. This is a fun pattern that looks a bit like blowing wind, or swirling bubbles.
Wednesday, September 5, 2012
it was a busy summer
I've had a busy summer, taxi-ing the kids around to activities, gardening, and just enjoying the short Iowa summer months. Any day over 80* is a good one in my book, and we did have alot of good days here this summer. I was doing some of this:
Now, the kids are back to school, and I've been at a more regular schedule in the quilt studio. I did quilt during the summer, but only limited hours. I must have not taken many pictures that I can find, but here a few things I worked on. A couple very cute embroidered quilts:
And a very bright, fun dinosaur quilt- quilted with the Triangles pattern with bright, variegated thread:
Now, the kids are back to school, and I've been at a more regular schedule in the quilt studio. I did quilt during the summer, but only limited hours. I must have not taken many pictures that I can find, but here a few things I worked on. A couple very cute embroidered quilts:
And a very bright, fun dinosaur quilt- quilted with the Triangles pattern with bright, variegated thread:
Sunday, June 24, 2012
Directions for an Ohio Star block
Looking for a fast way to piece a fun Ohio Star block? Here's a link to a blog named LoveLaughQuilt. Easy & fast- I think I might try it out! Cut out some squares & get started- no triangles to piece.
Love Laugh Quilt: Starry quilt: a collection
Monday, June 11, 2012
Kingbird Avenue is open again
Wanted to let you know that Kingbird Avenue is open again.... They had been re-surfacing the road & fro a while we had to drive around lots of road-closed signs. Everything but the middle line is finished. That should make it easier for those of you coming this way to drop off & pick up quilts.
Tuesday, May 22, 2012
Circle Play pattern
This one is quilted with pattern called "Circle Play". It's a fun pattern with circles of all sizes. It goes great with the black & white prints in this quilt.
August Rain pattern
Quite often I use simple/geometric patterns on t-shirt quilts. The piecer requested "August Rain" on this one, and I really think it enhances the quilt. I used a light gray thread here, and Quilter's Dream cotton batting.
Freehand custom
This quilt has some pretty applique on it. I usually do all-over patterns for this quilter, but I couldn't see quilting over the applique on this one. Instead, I did some freehand patterns in the background to fill in the white areas. She & I were both happy with how it turned out.
Thursday, April 12, 2012
Blacktop resurfacing
Kingbird Avenue- the blacktop just 1/4 mile from us is in the process of being re-surfaced. So, if you are coming to drop off a quilt, you may find some road closed signs. Right now they are just puting up stakes on the side of the road & you may be able to go around the road closed signs & get through. It depends on what part of the road they are working on during the day. I don't think the actual resurfacing will start for another week or two. I'll keep you posted on when it's open again.
Sorry for the inconvenience!
Tuesday, March 20, 2012
How to make a T-shirt quilt Part 1- Preparing the t-shirt blocks
Here's the method I use to make t-shirt quilts. It's a very simple layout & easy enough for a beginning quilter. These directions are for a lap size quilt- 69" x 54".
You will need approx. 1/2 yard of lightweight fusible interfacing per shirt. I am going to be cutting twelve 14.5" t-shirt blocks. So, you'll need about 6 yards of fusible interfacing for this quilt.
Step 1:
Cut out the whole front of the shirt- along the side edges, and along the top of the shoulder. You should have 1 layer of shirt now with your design on it.
Step 2:
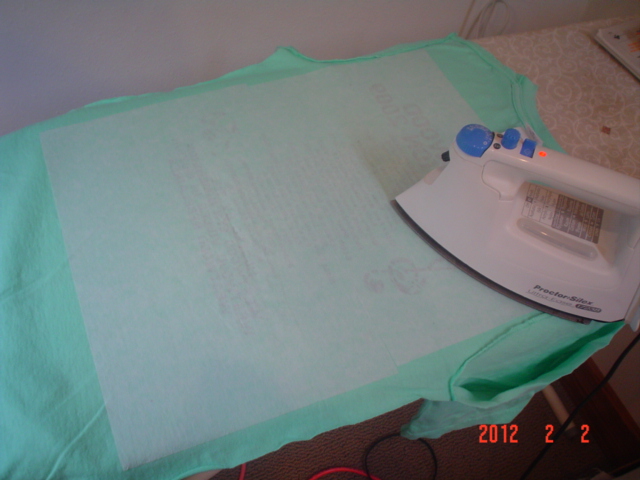
Cut an 18" square of your lightweight fusible interfacing. Lay your t-shirt, design side down, on an ironing surface. Place the interfacing on your shirt, making sure the fusible side is touching your shirt. Iron the interfacing to the shirt. Make sure all areas of the interfacing get enough heat/time with your iron to securly adhere it.
Step 3:
Flip your shirt over right side up on your cutting mat. Cut out a 14.5" square, centering the design. If you are going to make alot of these, a template is helpful. I had the lumberyard cut a 14.5" square template out of plexiglass. Then I could just plop the template down & cut around all 4 sides. It's not necessary, though- you can also just use the lines on your cutting mat.
You will need approx. 1/2 yard of lightweight fusible interfacing per shirt. I am going to be cutting twelve 14.5" t-shirt blocks. So, you'll need about 6 yards of fusible interfacing for this quilt.
Step 1:
Cut out the whole front of the shirt- along the side edges, and along the top of the shoulder. You should have 1 layer of shirt now with your design on it.
Step 2:
Cut an 18" square of your lightweight fusible interfacing. Lay your t-shirt, design side down, on an ironing surface. Place the interfacing on your shirt, making sure the fusible side is touching your shirt. Iron the interfacing to the shirt. Make sure all areas of the interfacing get enough heat/time with your iron to securly adhere it.
Step 3:
Flip your shirt over right side up on your cutting mat. Cut out a 14.5" square, centering the design. If you are going to make alot of these, a template is helpful. I had the lumberyard cut a 14.5" square template out of plexiglass. Then I could just plop the template down & cut around all 4 sides. It's not necessary, though- you can also just use the lines on your cutting mat.
Prepare 12 quilt blocks in this manner.
Sunday, February 26, 2012
Custom quilting
Some pictures of a very involved custom quilt that was finished last month. The straight feather sections were done with the IQ, also the diagonal 1/4" lines. The outer border was hand-guided, echoing all the applique, and also the straight line filler.
A very beautiful quilt- all that applique is done with perfect teeny tiny needle-turn hand stitching. For some reason I can't find a picture showing the whole quilt. But there are 9 large blocks just like the one in the first picture below. The quilter had made this from a pattern in Quilter's Newsletter Magazine if I remember right, and the magazine article showed how the original quilt was done. I tried to keep the same style of quilting as the original, but I did have to change it a little as the original one was antique, and the quilting was done by hand on that one.
Chevron Feathers pattern
Showing you a fun batik quilt, that was quilted using the "Chevron Feathers" pattern.
Here's the line drawing of the pattern- I thought the curvy lines of the pattern were a nice contrast to the sharp straight edges of the piecing.
A quilt for me
I've had this quilt top pieced for a few years, but had never quilted it. I often have a hard time motivating myself to quilt my own stuff when I have customer quilts waiting in line. But about a month ago, I decided just to pin in on the frame & get it done.
The feathered star quilt top is paper-pieced. There is a combination of hand-guided & computer-guided designs on the quilt. That large feather wreath is done with the Intelliquilter, I filled in the small stippling, and also the feather designs in the outer border as hand-guided patterns, as well as the checkerboard background fill in the cream corner areas.
Different binding techniques
I was looking through some quilting blogs, and came across this site that has lots of links to different quilting techniques. I thought this "faux" piped binding technique looks really interesting, and not really much harder than a regular binding. I just might give this a try!
http://tlcstitches.blogspot.com/2010/07/faux-piped-binding-tutorial.html
Let me know if you use this method & I'll post a picture here of how it turnes out-
http://tlcstitches.blogspot.com/2010/07/faux-piped-binding-tutorial.html
Let me know if you use this method & I'll post a picture here of how it turnes out-
Monday, January 23, 2012
Animal Stripes design
This t-shirt quilt was quilted using the Animal Stripes design- it went perfectly with the zebra design in the sashing fabrics.
Subscribe to:
Posts (Atom)